Hiding files and folders in Windows 10 and 11 is a simple yet effective way to protect your privacy or keep certain files out of view from others. Whether you want to keep personal documents safe, avoid clutter in your file system, or simply want to hide sensitive information, Windows offers built-in tools that make this process incredibly easy. In this guide, we will explore multiple methods to hide files on both Windows 10 and 11, ensuring you can choose the best approach for your needs.
Why Would You Want to Hide Files on Windows?
Before diving into the methods of hiding files, let’s take a moment to discuss why you might want to hide files in the first place. There are several reasons for hiding files:
- Privacy Protection: Hiding personal documents such as financial reports, personal notes, or passwords from prying eyes can help maintain your privacy.
- Reducing Clutter: Sometimes, users want to hide files or folders that are important but not regularly used, such as archives or large data files, to avoid cluttering the desktop or file explorer.
- Preventing Accidental Modification: If you’re working on important files and want to prevent accidental changes or deletions, hiding them can add an extra layer of protection.
- Security: While hiding files is not a foolproof way to secure sensitive data, it can act as an additional deterrent to casual snooping.
Regardless of the reason, hiding files in Windows 10 and 11 is a straightforward process. Let’s go through the various methods step by step.
Method 1: Using the Built-In "Hidden" Attribute in File Properties
One of the easiest ways to hide a file or folder on Windows is to use the built-in hidden attribute. This method works in both Windows 10 and 11 and requires no third-party tools. When you set a file or folder as hidden, it won’t show up in File Explorer unless you enable the option to show hidden items.
Steps to Hide Files and Folders Using the “Hidden” Attribute:
- Navigate to the File or Folder:
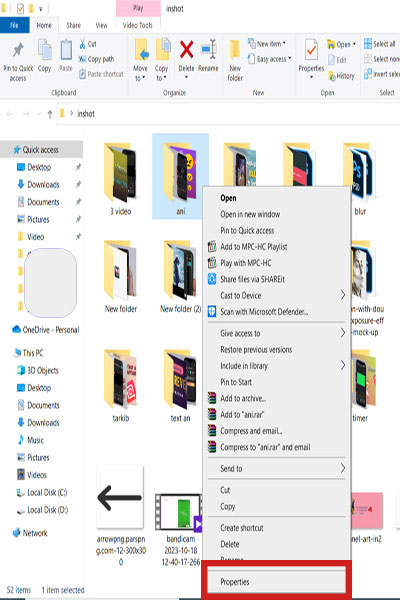
The first step is to locate the file or folder you wish to hide. You can do this by opening File Explorer and browsing to the specific location. - Right-click and Open Properties:
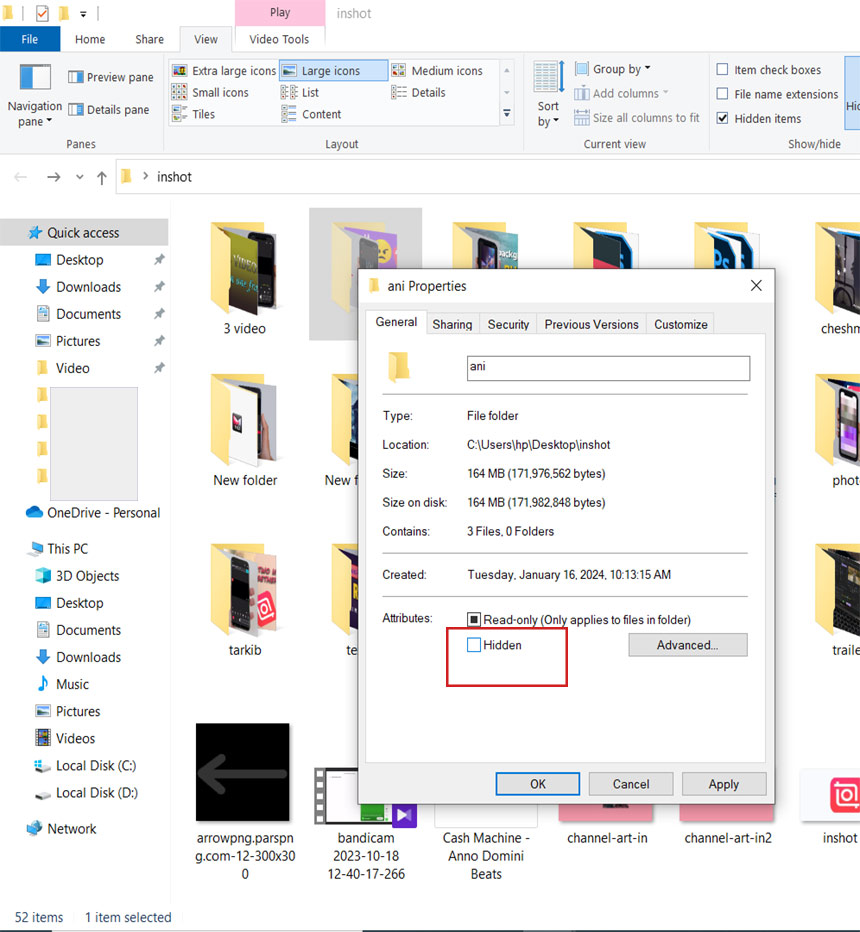
Once you’ve found the file or folder, right-click on it and select Properties from the context menu. - Enable the Hidden Attribute:
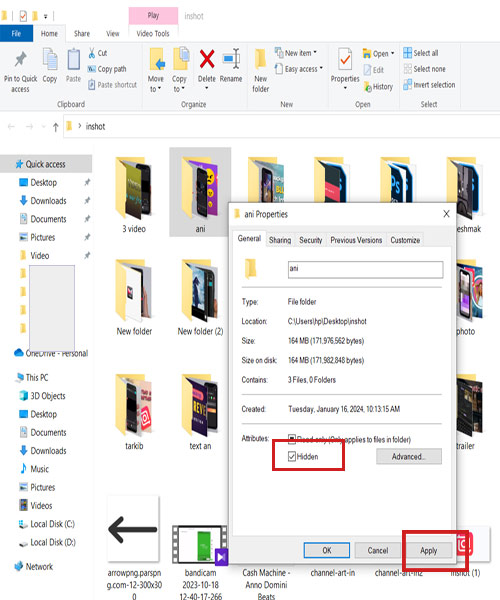
In the General tab of the Properties window, you’ll see a checkbox labeled Hidden. Simply check this box to mark the file or folder as hidden. - Apply and Close:
After selecting the Hidden option, click Apply to confirm the changes, and then click OK to close the Properties window. - Viewing Hidden Files:
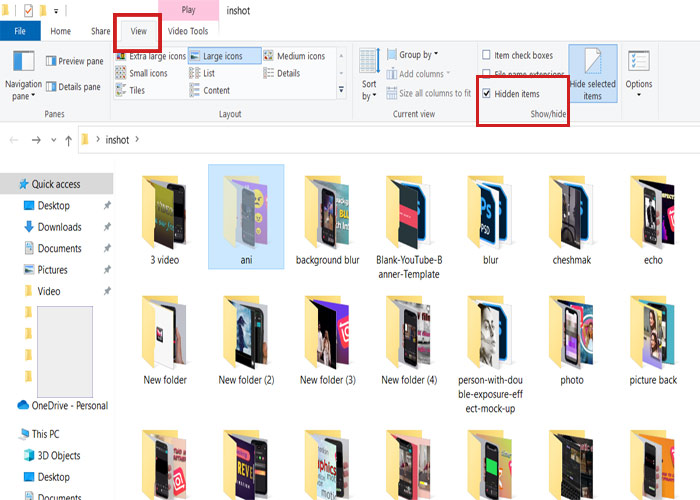
By default, hidden files are not visible in File Explorer. If you want to see hidden files, follow these steps:- Open File Explorer.
- Click on the View tab (in Windows 10) or View > Show (in Windows 11).
- Check the Hidden items box to display hidden files and folders.
How to Unhide Files:
If you want to make the file visible again, simply repeat the steps above and uncheck the Hidden box in the file’s Properties window. After that, click Apply, and the file will be visible again in File Explorer.
Method 2: Using Command Prompt to Hide Files
For those who prefer working with the command line, the Command Prompt provides a more manual but powerful method to hide files and folders. This method is especially useful for users who are comfortable with typing commands and want to hide multiple files quickly.
Steps to Hide Files Using Command Prompt:
- Open Command Prompt:
To start, open the Command Prompt. You can do this by typing cmd in the search bar next to the Start menu and selecting Command Prompt from the list. - Navigate to the Directory:
Next, use the cd (change directory) command to navigate to the folder that contains the file or folder you want to hide. For example:
bash
Copy code
cd C:\Users\YourName\Documents
- Hide the File:
Once you’re in the correct folder, use the attrib command to hide a file. The syntax is as follows:
bash
Copy code
attrib +h filename
Replace filename with the name of the file or folder you want to hide. For instance, if you wanted to hide a file named financial_report.txt, you would type:
bash
Copy code
attrib +h financial_report.txt
- Check if the File is Hidden:
After running the command, the file will be hidden, and you won’t see it in File Explorer unless you enable the option to show hidden items, as mentioned in Method 1.
How to Unhide Files Using Command Prompt:
To unhide the file, simply reverse the attrib command:
bash
Copy code
attrib -h filename
This will make the file visible again in File Explorer.
Method 3: Using File Encryption for Enhanced Security
While hiding files is a great first step, it’s not a secure method if you want to prevent unauthorized access. If you’re looking for a higher level of protection, you can use encryption to lock your files with a password. Windows 10 and 11 offer built-in file encryption using BitLocker (for drives) and Encrypting File System (EFS) for individual files and folders.
Encrypting Files Using EFS:
- Right-click the File or Folder:
Navigate to the file or folder you wish to encrypt, right-click on it, and choose Properties. - Open Advanced Attributes:
In the General tab, click on the Advanced button. - Enable Encryption:
In the Advanced Attributes window, check the option Encrypt contents to secure data and click OK. - Apply Changes:
Click Apply and OK to finish. Windows will now encrypt the file or folder, ensuring that only users with the correct credentials can access the contents.
Method 4: Using Third-Party Software to Hide Files
If you’re looking for additional features and functionality, several third-party applications are available to help you hide and secure your files. Some of the most popular options include:
- Wise Folder Hider: A free program that allows you to hide files, folders, and even USB drives.
- HiddenDIR: A file-hiding tool that allows you to hide directories and files without encryption, providing a simple way to make files disappear.
These tools often offer features like password protection, file encryption, and even the ability to hide entire drives. While they are not necessary for basic file hiding, they provide an added layer of functionality for advanced users.
Best Practices for Hiding Files in Windows 10 and 11
While hiding files is an easy task, it’s important to consider a few best practices to ensure that your data is properly protected:
- Use Encryption: If the files you’re hiding are sensitive or personal, it’s always better to encrypt them for added security. The built-in encryption tools in Windows, like EFS and BitLocker, can prevent unauthorized users from accessing your files.
- Backup Hidden Files: It’s a good practice to back up important files, even if they’re hidden. If something goes wrong with your computer or operating system, you’ll still have access to your backups.
- Don’t Rely Solely on Hidden Attributes: Hiding files is not the same as securing them. Users who know where to look can easily uncover hidden files. If you need true privacy, use encryption in addition to hiding files.
- Manage Hidden Files Efficiently: If you hide a large number of files, keeping track of their locations can become difficult. Consider organizing them in dedicated folders or using third-party software to manage your hidden files.
Conclusion
Hiding files and folders in Windows 10 and 11 is a straightforward process that can be accomplished using built-in tools like the hidden attribute in file properties or Command Prompt. If you need a higher level of security, using encryption or third-party software may provide enhanced protection for sensitive data.
While hiding files is an excellent way to keep your documents out of sight, it’s important to remember that it’s not a foolproof security measure. If you’re handling highly sensitive data, it’s always best to use encryption alongside file hiding techniques to ensure your privacy and security.
By following the methods outlined in this guide, you’ll be able to protect your files and maintain a cleaner, more organized file system in Windows 10 and 11.

